


Build a Todo app in React with Supabase - The Open-Source Firebase alternative
Getting familiar with Supabase by making a Todo app and comparing it with Firebase.


Firebase has always been the go-to BaaS(Backend-as-a-Service) service provider for the majority of front-end developers. It takes care of all the behind-the-scenes backend stuff so that you can concentrate on the front-end of the application. By providing an array of services like Authentication, Storage, Database, Real-time updates, Hosting, Push-notification, firebase has helped in the rapid development.
Enough about firebase. There is another provider called Supabase, which claims to be the open-source alternative for firebase.
What is Supabase?
Supabase is a Backend-as-a-Service provider, that lets you start your project with a Postgres Database, Authentication, instant APIs, real-time subscriptions, and Storage. It is built using a combination of open-source tools. So there is no vendor lock-in. You can self-host your project if you ever need it. Supabase, in comparison to firebase, has relatively fewer features, giving its age. At the time of making this article, Supabase had
Database
Authentication
Storage
Unlike firebase's NoSQL database, Supabase provides a full-fledged PostgreSQL database for every project with instant API and real-time subscriptions.
Supabase has a free-tier plan similar to firebase, and it is more than sufficient for hobbyists. So get your Supabase account and start making the todo app.
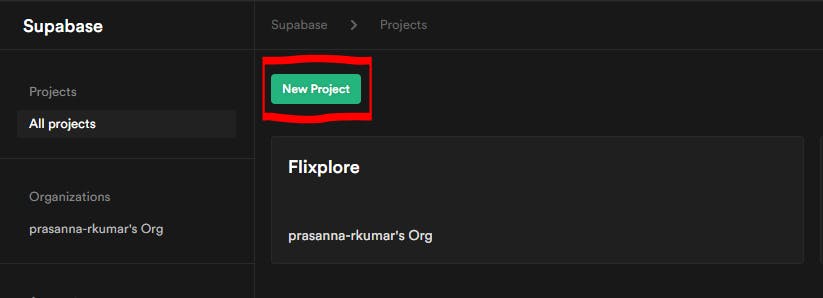
Create Supabase Project
Log in to your supabase account and navigate to the dashboard.
Click on "New Project".
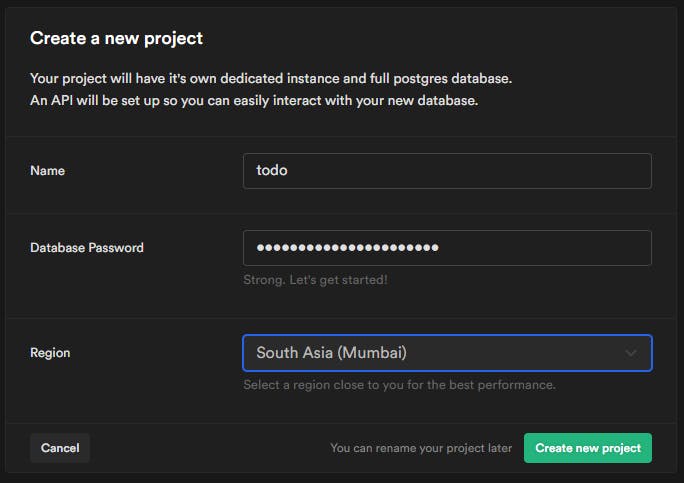
Choose a name for your project. I named my project "todo". Then type in a secure password and select a region closest to you and click on "Create new project".
Wait until Subapase is setting up the project, as it can take a while.

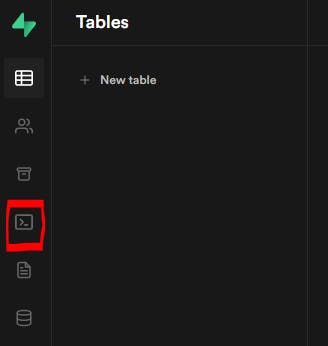
After completing the setup, you will be redirected to the Tables page. Now you can start creating tables and insert data into them, all through the dashboard. Alternatively, you can also write PostgreSQL queries, to perform any operation with the database.
Now click on the SQL option from the side menu.
The SQL editor will open up with a list of frequently used general-purpose scripts. Click on the Create Table script.

Replace the default query with the following query and click on "RUN".
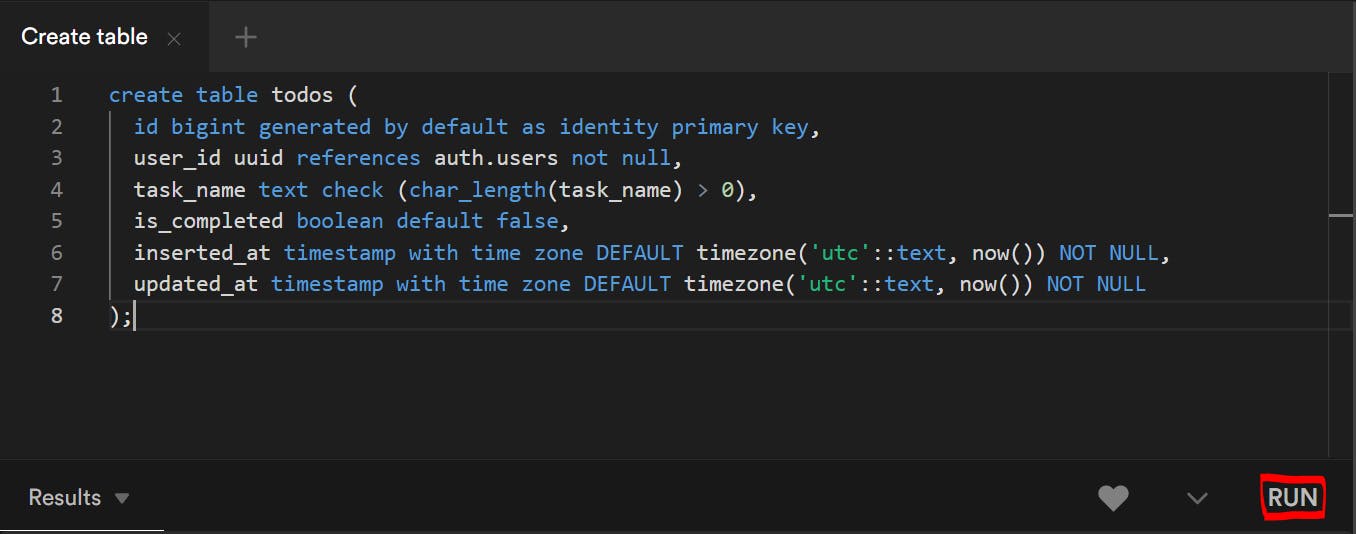
create table todos (
    id bigint generated by default as identity primary key,
    user_id uuid references auth.users not null,
    task_name text check (char_length(task_name) > 0),
    is_completed boolean default false,
    inserted_at timestamp with time zone DEFAULT timezone('utc'::text, now()) NOT NULL,
    updated_at timestamp with time zone DEFAULT timezone('utc'::text, now()) NOT NULL
);
- The results section at the bottom will show "Success".
Project initial setup
Our Postgres database is now ready with the Todos table. Now, let's start making the React app. To concentrate more on integrating supabase into React, I've made a starter kit with all the necessary UI components and styling.
- You can start by cloning the starter kit and working on top of that.
git clone -b starter-kit https://github.com/prasanna-rkumar/todo-supabase
- Install all the dependencies and run the project using the following commands.
npm i
npm start
Open localhost:3000 to see the app in the browser.
Now, let's install the Supabase client into the project
npm install @supabase/supabase-js
- Create a
.envfile in your project's root folder and add the following lines.
REACT_APP_SUPABASE_URL=
REACT_APP_SUPABASE_KEY=
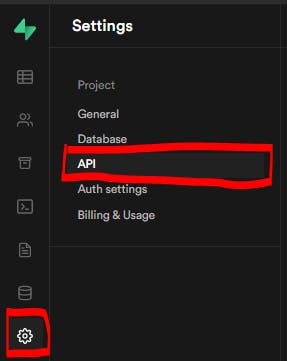
We need to get these values from the project dashboard. Navigate to the settings page in your project dashboard and click on API.
Copy the URL and the public key and paste them into the
.envfile.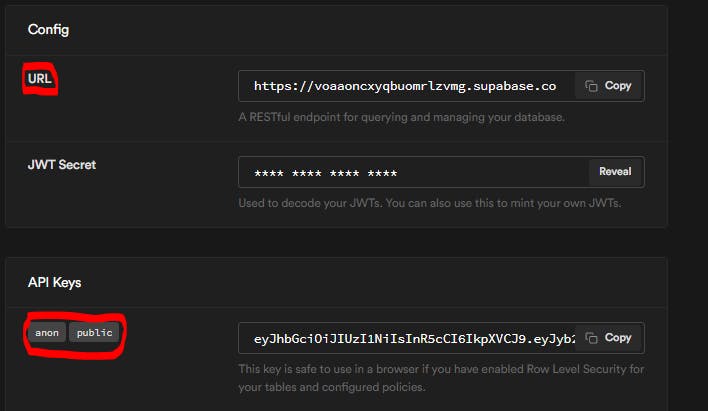
Now, create a new file called
supabaseClient.jsin thesrcdirectory and add these lines.
import { createClient } from '@supabase/supabase-js';

export const supabase = createClient(
  process.env.REACT_APP_SUPABASE_URL,
  process.env.REACT_APP_SUPABASE_KEY
);
Authorization Flow
Firstly we need to restrict unauthorized users from accessing the Todos. To do that, we need a custom react-hook, that can listen to authorization changes and update the state accordingly.
Create a new folder called
hooksin thesrcdirectory and add a fileuseAuthState.js.Add the following code into the file. This custom hook sets the session user if already authenticated and listens for any changes in the session, and updates the
userstate accordingly.
import { useEffect, useState } from "react";
import { supabase } from "../supabaseClient";

const useAuthState = () => {
  const session = supabase.auth.session();
  const [user, setUser] = useState(session?.user ?? null);

  useEffect(() => {
    const {
      data: authListener
    } = supabase.auth.onAuthStateChange(
      (event, session) => {
        const currentUser = session?.user;
        setUser(currentUser ?? null);
      }
    );

    return () => {
      authListener?.unsubscribe();
    };
  }, []);

  return { user };
};

export default useAuthState;
- Import this custom hook into the App.js file and use the
userobject to determine whether to render the Todo page or Auth page.
import './App.css';
import useAuthState from './hooks/useAuthState';
import Todos from './pages/Todo';
import Auth from './pages/Auth'

function App() {
  const { user } = useAuthState();

  return (
    <div className="App">
      {
        user ? <Todos /> : <Auth />
      }
    </div>
  );
}

export default App;
Authentication flow
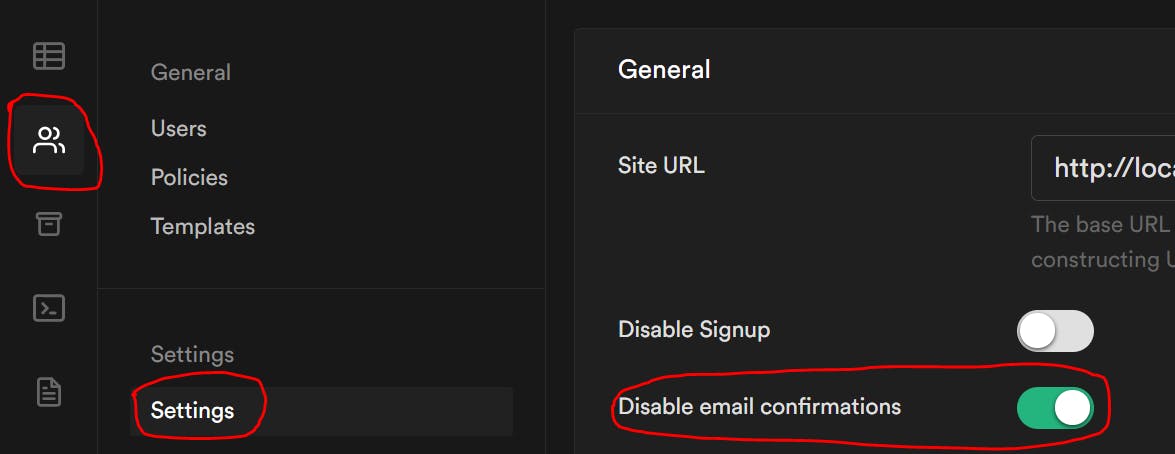
Firstly, open the Authentication setting in the project dashboard and disable email confirmation to allow users to automatically sign in after registering. Note: This setting is not advisable in a production environment.
Open the Auth.js file and add a function called
handleAuthto handle Authentication and show an error message.
const handleAuth = async ({ isLogin }) => {
    const { error, data, session, user } =
      isLogin
        ? await supabase.auth.signIn({ email, password })
        : await supabase.auth.signUp({ email, password });
    if (error) {
      setError(error.message)
      setPassword("")
    }
    console.log(error, data, session, user)
  }
- Call the handler function from the onClick event of the Sign in and Sign up buttons with the respective parameters.
<div className="Form-submit-container">
    <button className="App-button Form-submit" type="submit" onClick={(e) => {
        e.preventDefault();
        handleAuth({ isLogin: true });
    }}>
        Sign in
    </button>
</div>
<div className="Form-submit-container">
    <button className="App-button Form-submit" type="submit" onClick={(e) => {
        e.preventDefault();
        handleAuth({ isLogin: false });
    }}>
        Sign up
    </button>
</div>
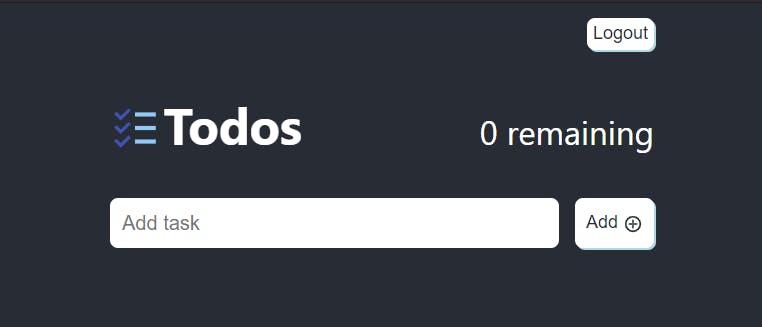
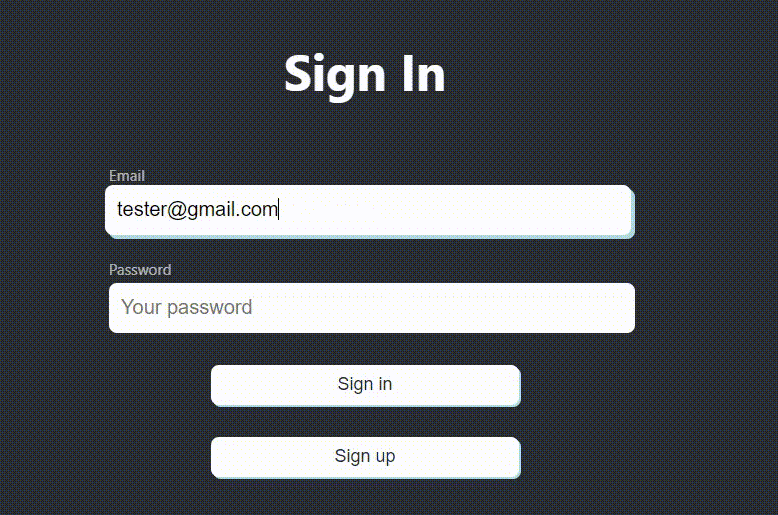
Sign up using any email id and password and you will be instantaneously taken to the Todos page.
Open the
Todos.jsfile and navigate to the logout button's onClick event and call the signout method from auth.
<button
    onClick={() => {
        supabase.auth.signOut()
    }}
>
    Logout
</button>
- Click the logout button in the app to log out and get redirected to the Login page.
We have completed the Authentication and authorization flow for the App. Let's add the todo functionality to the app.
Todo CRUD operations
- Open the
Todos.jsfile and add a new state variable called todos and run a select query in theuseEffecthook to fetch the tasks from the database and set it to the respective state variable. Initially, there will be none.
const [todos, setTodos] = useState([]);

  const selectTodos = async () => {
    let { data } = await supabase
      .from("todos")
      .select("*")
      .order("id", { ascending: false });
    setTodos(data)
  }

  useEffect(() => {
    selectTodos();
  }, []);
- Send the
setTodosfunction as a property to the AddTodo component<AddTodo setTodos={setTodos} />and call the insert method upon the add button's onClick event.
const AddTodo = ({ setTodos }) => {
  const [task, setTask] = useState("");
  const onSubmit = (event) => {
    event.preventDefault();
    if (task === '') return;
    supabase
      .from("todos")
      .insert({ task_name: task, user_id: supabase.auth.user().id })
      .single().then(({ data, error }) => {
        console.log(data, error)
        if (!error) {
          setTodos((prevTodos) => [data, ...prevTodos]);
        }
      })
  };
  return (
    <form className="Input-container">
      <input
        className="Input-field App-border-radius"
        placeholder="Add task"
        type="text"
        value={task}
        onChange={(e) => setTask(e.target.value)}
      />
      <button type="submit" onClick={onSubmit} className="App-button Add-button App-border-radius">
        Add <IoMdAddCircleOutline size={20} style={{ verticalAlign: "middle" }} />
      </button>
    </form>
  );
};
- To render each task, send the setTodos method as a property to the
Todocomponent and modify as follows.
const Todo = ({ id, is_completed, task_name: task, setTodos }) => {
  const [todo, setTodo] = useState(task);
  const [completed, setCompleted] = useState(is_completed);

  const onEditTodo = (id, task) => {
    supabase
      .from("todos")
      .update({ task_name: todo })
      .match({ id }).then((value, error) => {
        console.log(value, error)
      })
  };

  const onCompleteTodo = (id) => {
    supabase
      .from("todos")
      .update({ is_completed: !completed })
      .match({ id })
      .then(({ data, error }) => {
        console.log(data, error)
        if (!error) {
          setCompleted((prev) => !prev);
        }
      })
  }

  const onDeleteTodo = async () => {
    const { error } = await supabase
      .from('todos')
      .delete()
      .match({ id })
    if (!error) {
      setTodos((prev) => {
        return prev.filter((todoItem) => {
          return todoItem.id !== id
        })
      })
    }
  };

  return <div key={id} className="List-tile App-border-radius">
    <input checked={completed} className="List-tile-leading" type="checkbox" onChange={(e) => {
      e.preventDefault();
      onCompleteTodo(id);
    }} />
    <input value={todo} onChange={(e) => {
      const { value } = e.target;
      setTodo(value);
    }} />
    {task !== todo && <button onClick={() => onEditTodo(id, todo)} className="Todo-update-submit">save</button>}
    <TiDeleteOutline className="List-tile-trailing" onClick={onDeleteTodo} />
  </div>;
};
Note that we are manually maintaining the state upon each of the CRUD operations. But in Firestore, we can listen to snapshot changes and update the state accordingly. We can do the same with Supabase's subscription, but there's a slight issue with that approach.
Before explaining what's wrong with this method, let's first make sure our app is secure by enabling row-level security and adding authentication policies.
- Open up the SQL editor and run the following query to enable row-level security against the todos table.
alter table todos enable row level security;
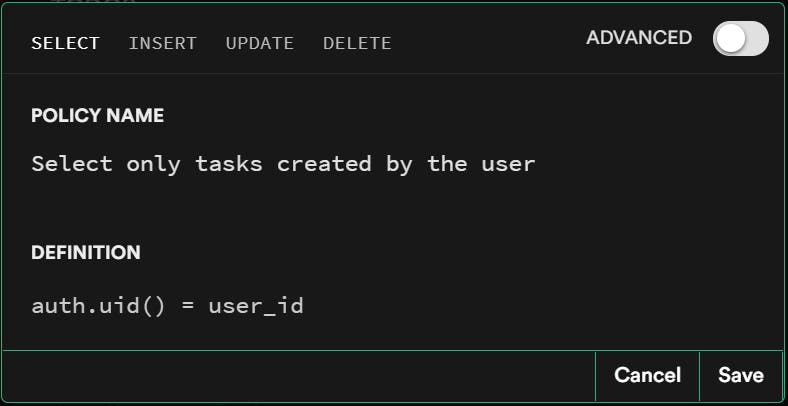
Now, click on Add policy and create an authentication policy similar to this.
Repeat the same process for all the remaining three operations (update, delete and insert) so that your policies end up as follows. Don't forget to name your policies uniquely.
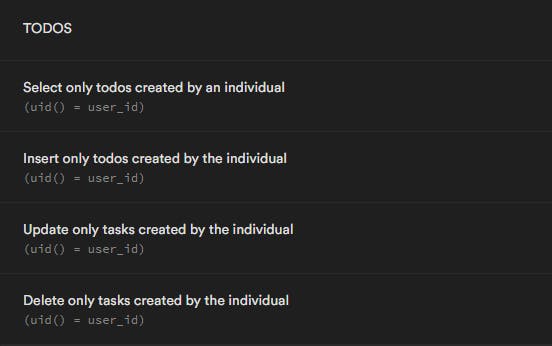
With all these policies, we've secured our database from accepting rogue entries. Also, note that we never mentioned a where clause in our select query. Since we have the policies in place, the select query will return only those rows that are created by the currently authenticated user.
Now, let us find what's wrong with Supabase and its real-time subscriptions on the client-side.
Realtime-updates with Supabase.
Supabase provides a real-time subscription, but it is by default disabled. To enable it, navigate to the Database tab and click on "Replication".
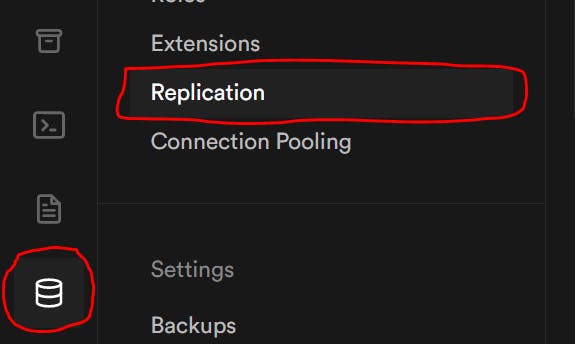
You can see that there are 0 tables in the supabase_realtime.

Click on the tables and enable replication for the todos table.

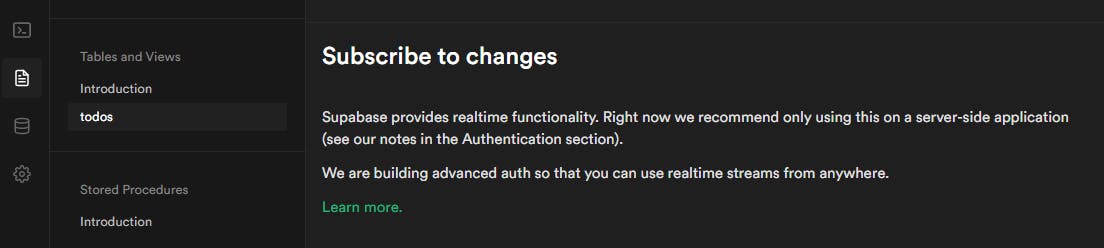
Now we can receive real-time updates from the client. But, Supabase advises us to use this feature only on the server-side because the authentication policies are not considered while sending real-time updates.
We can restrict the data received only at the client-side by listening to row-level changes. This is a serious security issue and therefore Supabase asks us to use real-time updates in client-side, only on a public table.
So far, Supabase seems promising. Serverless function is the next big feature in Supabase that will be releasing. Supabase is still in beta. So the fact is it's still very young. Not to forget the Open-source nature of the product. We will be able to receive many new features soon.
You can find the source code for this app in my GitHub and this is the live demo.